Creating display frames
- Claire

- Aug 11, 2021
- 3 min read
Updated: Oct 23, 2021
This blog post will cover some of the techniques you can use to paint and assemble the ladder and shiplap frame that display your interchangeable square inserts.
A separate blog post for painting the inserts is here.

Throughout the seasons you can find DIY Art kits here or ask to have a workshop converted to a kit. If you have your own supplies from a craft store, feel free to follow along below!
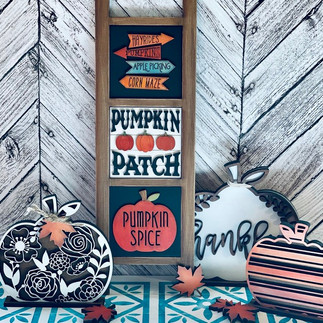
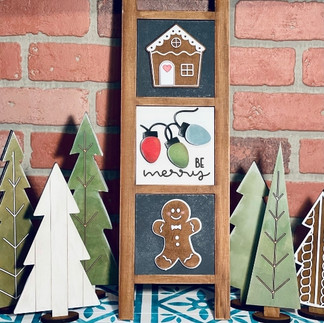
THE LADDER

Creating this leaning ladder is deceptively simple and it such an effective display stand!

The ladder comes in 4 pieces:
1 x 18 " ladder cut out
3 x backers with finger holes
(inserts are separate and not covered in this post)

You should paint the ladder, but the backers are optional. In this example I have painted them, for continuity, but they won't be seen behind the inserts, so it's not essential.
You can paint the ladders with acrylic or chalk paints in any color you choose. Remember that if you want to interchange the inserts seasonally, so you may want to stick with neutral colors, so as not to detract from the art you'll be displaying.
Good neutral colors are brown, white, black and grey.
If you want a splash of color, then the rainbow is yours to pick from!

To create a rustic wood-like finish, I have chosen acrylic paint in burnt umber.
Dry-brush the paint onto the wood with a sponge brush.
Do not use water! It may cause your display to swell and affect the fit of your inserts.
Rub off excess paint with a cloth or paper towel, especially on the inside edges.

One layer of paint dries with a grainy effect. If you want a more solid finish, add additional layers of paint, drying between each coat.

Once the ladder is dry, use a fast acting glue, like Aleene's Turbo Tacky Glue, craft glue, super glue or wood glue to stick the backing pieces onto the back of the ladder. See the clip below for technique. Use a tiny amount of glue! Less is more.
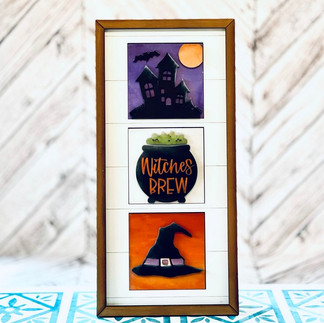
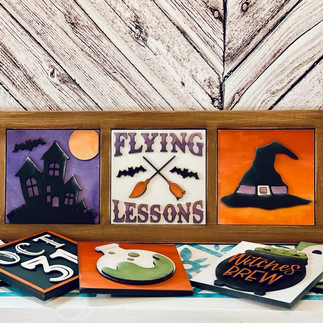
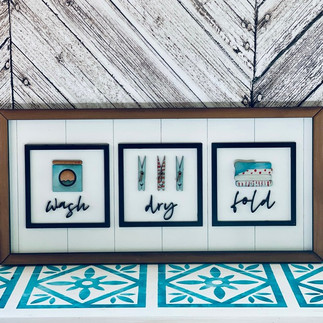
THE SHIPLAP FRAME:

When you tell people you made this gorgeous interchangeable frame yourself, they'll be so impressed! Follow below for the instructions.

The shiplap frame comes in 8 pieces:
1 x shiplap cutout
2 long + 2 short fame pieces
3 x backing pieces with finger holes
(inserts are separate and will be covered in this post)
Dry brush a sparing amount of acrylic paint onto the 4 framing pieces.
Avoid using too much paint or water, especially on the inside edges, as it may cause the wood to swell, thereby affecting the fit of your square inserts.
I used burnt umber acrylic, but you can use any other acrylics or chalk paints. Neutral colors for all-seasons are white, black, brown and grey, but you can use any colors you'd like.
For a deeper finish, apply more than one coat of paint.

The shiplap cutout can be painted with chalk paints, acrylics or spray paint. I used a white chalked spray paint and applied 2 thin layers.

When the pieces are dry, apply a thin line of glue onto the framing pieces and attach them to the front of the shiplap. They will nest perfectly into each other at the edges of the cutout.
My preferred glue is Aleene's Turbo Tacky glue, because it dries fast and clear.
See the clip below for technique.

Allow to set for a couple of minutes before flipping over.

Apply a thin line of glue to the back edges of the cutout.

Glue the backing pieces onto the back of the frame.
See the clip below for technique.
Allow the fame to dry and get your inserts ready!
Ladders and shiplap frames are best leaned up against a wall or hard surface, but if you choose to hang them on a wall, you can use contact strips.
To prevent the inserts from falling out, you can either use masking tape or velcro rounds. This shouldn't be necessary, if the ladder/ frame are angled.
You will have so much fun with these displays!
To see techniques on painting the square inserts see here.


Thanks for joining me! I can't wait to see what you do with your displays! Please share them with me directly at claire@threeand.me or on social media with tag @threeandme.
Warmly,
Claire
xoxo

#threeandme #fall #ladders #shiplap #halloween #leaningladder #framed #laundry #squares #3d #paint #create #framed #diy


Comments