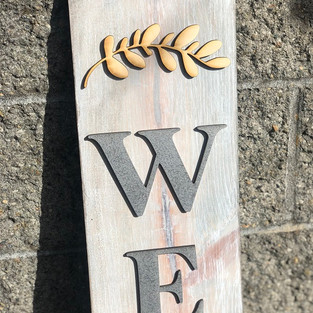
Welcome Sign
- Claire

- Jan 11, 2021
- 4 min read
Updated: Jan 15, 2021
Create a warm welcome for the entrance to your home, office or shop with this beautiful 4 ft tall wood sign.

Order the all-inclusive DIY Art Kit here or source your own supplies and follow along with the directions below to create a sign to warm up your door!
The DIY Art Kit includes:
4'x7.25" pine (cut from 1x8x8 pine)
wood cut out lettering, WELCOME*
1 wood wreath
1oz background paint in burnt umber acrylic*
1/2 oz letter paint in white acrylic*
1 re-suable sponge brush
1 sponge wedge
sandpaper
*= unless otherwise ordered- you may have selected different options
Additional supplies you will need:
glue- I prefer Aleene's Turbo Tacky Glue
paper plates
paper towels
ruler or measuring tape
Get comfortable. Put on an apron- it may get messy. Grab a snack and a drink and let's get going ...

All pine planks you receive in your art kits will have been sanded and smoothed for you by myself. Wood has been hand selected to be as straight as possible and with knots situated in pleasing places. If you are selecting our own wood, try to get planks that are as straight as possible, although wood will naturally warp over time. Knots and grain are charming and add an authentic handcrafted feel to your piece.
Using the sandpaper included in the kit sand any rough edges of your board if you want it to be more rounded. It'll give you a smoother finish. You can, if you want to, sand the broad surfaces, to give you a distressed look.
There will be natural variation in wood, even from one side to the other, so pick the side that looks best to you, according to the orientation of knots and natural imperfections, to be the front show-piece side.

Pour some of your background paint onto a paper plate. In this case, I am using burnt umber acrylic paint.
You can use any background color or stain to suit your look. For the purpose of these DIY Art kits, I recommend acrylic paints, because they are less toxic than oil-based stains, do not have a strong odor for indoor use, dry fast and are much easier to clean up.

If you'd like to add a touch of interest to your stain, you can add a drop of complimentary color to it, such as grey, shimmer or white. If you are adding another tone of paint for interest, swirl the paint together to get a rough marble, rather than a smooth texture. This technique will add high and low lights to your board.

Using the sponge brush wipe the paint over all surfaces of your board in smooth long strokes. Don't use too much paint. Rather apply sparingly and consider additional coats for more coverage. Use a paper towel to push color into the wood grain and to remove excess paint. This dry rub technique does not call for the addition of water.
Work at a fairly rapid pace, because acrylic paint dries fast and you want to prevent streaking. Should you get streaks, then smooth out the texture by adding additional paint around the streaks and use a damp paper towel to blend. You can also wait until the paint has dried and distress the board with sandpaper.
Allow the board to dry fully.
Some other color examples:

This board was painted using burnt umber acrylic paint mixed with a hint of teal.

In the sign above, a white acrylic base paint was used, with a hint of grey. After drying, I used sandpaper to lightly distress the board.

This red sign was painted using barn red acrylic paint in 2 coats for a solid, bright color.

Using the dry sponge wedge, blot a sparing amount of color onto your lettering and wreath. Do not overload the wedge, to prevent paint from running down the sides of your lettering , thereby affecting the finish. Less is more! Rather add a second coat of paint for additional coverage.
Dry well.

For this next step, you will be needing a ruler and glue. I like Aleene's Turbo Tacky Glue, which dries fast and clear, but you can also use wood glue or superglue or even hot glue in a pinch.

Lay out your letters and wreath on your board to eye-ball approximate placement. Then use a ruler to make sure each letter is placed centrally to the board edges and equidistant from each other.

In this image, you can see that the lettering also works horizontally!

An easy cheat is to cut or fold a piece of paper to the size of the gaps you'll need between letters, so you don't have to measure each time.

My "WELCOME" letters looked good at 1.5 inches from each other, but you may choose to have yours closer or further apart. This will also vary according to the wording you've chosen!

Apply a small amount of glue to each letter and place it.

Once the glue has dried you can varnish your board with a non-yellowing varnish from Krylon or Rustoleum or even Mod Podge to protect it from the weather fluctuations.

The board will last longer if placed under a protective roof, although some weathering can make it look charming.
Your sign can be augmented or accessorized with ribbon, raffia, flowers and beads, to suit different seasons.
Enjoy your new sign!
Please share photos of your signs with Three & Me on social media like here on Facebook or here on Instagram with tags #threeandme or @threeandme.
Thank you for joining me!
Warmly,
Claire
Owner & Creative Director | Three & Me


Comments